
Polar bear Drawing
Polar bears must be found all through the Cold area. Consequently. It is doubtful that we’ll get to see one very close at any point except if you make a trip toward the north pole. Why not draw a cute polar bear? You’ll have your special polar bear right readily available by figuring out how to draw one. Polar bear drawing & bull drawing or other drawing ideas for every drawing lover.
To simplify it, we have created a bit-by-bit process on the most proficient method to draw a polar bear, summarized in basic and simple tasks. Every guidance accompanies outlines you can use as your visual aids, making the means simpler to follow. The most fantastic aspect? You can modify your drawing and handpick the varieties as well!
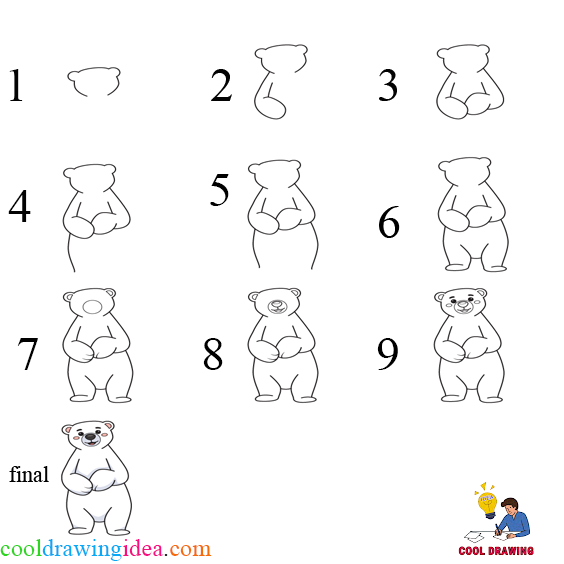
Stage 1 – polar bear drawing
Start by drawing a blueprint of the polar bear’s head on the upper part of your paper. You can make the top of the polar bear by just drawing an irregular circle shape with two crescents on each side over the head framing the ears. You can make reference lines by drawing a meeting vertical and even line across your paper to guarantee that the polar bear will be attracted to the middle.
The upward line over the flat line in the center is where you should draw the polar bear’s top. By doing this, you will have adequate room at the base for the whole body of the polar bear.
Stage 2 – Draw the Left Arm of the Polar Bear
Draw a lengthened bent shape under the polar bear’s head to structure the arm. Ensure the component is marginally calculated, as displayed in the delineation.
Visit www.cooldrawingidea.com for the latest drawing tutorial
Stage 3 – Complete the Polar Remain battle ready
Define a calculated descending boundary on the right side underneath the top of the polar bear to frame the right arm. Then, at that point, define a bent boundary that almost shapes a fragmented circle straightforwardly associated with the arm. This makes the hand finish the right arm of the polar bear.
In the wake of finishing this step, the two arms of the polar bear ought to now be finished.
Stage 4 – Draw the Left Half of the Lower Body
Go on by defining a marginally bent boundary underneath the passed-on arm to frame the left half of the polar bear’s lower body.
Stage 5 – Finish the Type of the Lower Body
Rehash the last step on the contrary side to finish the type of the lower body. As of now, the lower body ought to be organized entirely. Presently, all the body is missing are the legs, which is what we’ll be going after in the following stage.
Stage 6 – Draw The two Legs of the Polar Bear
Define short bent boundary-looking inverse headings in the lower part of the polar bear’s lower body. This makes the two legs of the polar bear. To make the two feet, define another boundary framing a sideways oval shape at the lower part of every leg.
Stage 7 – Add Subtleties All around the Polar Bear
In this step, we will presently be drawing the subtleties and examples all around the body of the polar bear. These assists make your opposing hold on for looking sensible. From the top to the base, continue by drawing a shape inside every ear following its unique blueprint.
This makes within ears. Then, draw a tiny circle shape inside the essence of the polar bear, featuring its nose—finally, little bent lines on its hands to make the presence of paws.
Stage 8 – Next, Draw the Nose and the Mouth
Continuing toward the facial elements of the polar bear, go on by drawing an irregular circle shape for the nose. Then, at that point, draw a bit sideways oval shape inside the nose. A short time later, two associated bent lines underneath the nose. Then, define a bent boundary right under to frame the mouth. Remember to add a bent line inside the mouth to shape the tongue of the polar bear!
Stage 9 – Presently, Draw the Eyebrows and the Eyes
Complete the look by making the eyes and the eyebrows. Define two short bent boundaries framing the angled eyebrows. Ensure that the eyebrows are thick and adjusted to one another. Then, draw a circle shape under every eyebrow to make the eyes. Presently, add shade to the eyes while leaving a little spot unshaded to cause the eyes to seem like it’s gleaming!
Draw a sideways oval shape on the two cheeks for an extra sensational impact. This makes your polar bear’s cheeks look flushed — so charming! Now that we’ve effectively drawn a polar bear, it’s at long last time for the most exciting part: picking the tones and shading the polar bear.
Polar bears are transcendently white in variety, allowing them to cover in their cold climate easily. Yet, did you have at least some idea that the polar bear’s jacket has no white color? Indeed, the polar bear’s skin is dark, and its fur is straightforward.
You can pick a variety of the polar hold-on for its unique white tone or utilize a particular arrangement of types. One way or the other, we’re sure the varieties will end up being fantastic!